qq推广加好友上海seo公司
1.修改滚动条样式
设置scrollbar的thumb的样式之前,要先设置scrollbar的width和高度,不然效果看不见。
/* 设置滚动条样式 */
/* 设置scrollbar-thumb之前要设置scrollbar的width和height */
::-webkit-scrollbar-track {border-radius: 0;background-color: #f2f3f8;
}
::-webkit-scrollbar-thumb {border-radius: 0;border-radius: 5px;background-image: -webkit-linear-gradient(0deg, #3ca5f6 0, #a86af9 100%);-webkit-transition: all .2s;transition: all .2s;
}
::-webkit-scrollbar-corner {background-color: #f2f3f8;
}
::-webkit-scrollbar {width: 8px;height: 8px;
}
2.webkit的作用
这是由于不同浏览器的兼容问题,webkit是chrome浏览器的内核。能适配webkit为内核的浏览器。edge虽然能执行–webkit开头的代码,但它不是webkit内核的浏览器,可能会出现一些问题。
3.直接使用transform和使用animiation的区别
这里如果使用@keyframes动画写的话,鼠标离开时,头像无法回转的效果。
直接使用transform则会出现回转的效果。
.avatar-img {box-sizing: border-box;position: absolute;border-radius: 50%;bottom: 12px;left: 50%;padding: 5px;transform: translateX(-50%);width: 75px;height: 75px;transition: all 1s;&:hover {// 如果使用动画的话,鼠标移开则没有回退原来的位置效果。transform: translateX(-50%) rotate(360deg);}
4.transform的注意点
这里hover之前使用了transform来调整位置,所以hover时,transform要带上之前transform的代码,不然之前设置的transform会清空,会出现位置错乱进行旋转的情况。
.avatar-img {box-sizing: border-box;position: absolute;border-radius: 50%;bottom: 12px;left: 50%;padding: 5px;transform: translateX(-50%);width: 75px;height: 75px;transition: all 1s;&:hover {// 如果使用动画的话,鼠标移开则没有回退原来的位置效果。transform: translateX(-50%) rotate(360deg);}
5.把背景颜色应用到文本中
background: radial-gradient(...): 这是一个用于创建径向渐变背景的属性。它使用了radial-gradient函数来定义渐变的形状和颜色。circle at 49.86% 48.37%: 这个部分定义了渐变的中心点位置。在这个例子中,渐变的中心点位于距离容器左上角 49.86% 的水平位置和 48.37% 的垂直位置。#0090ff 0, #0089ff 3.33%, #3a82ff 6.67%, ...: 这个部分定义了渐变的颜色和位置。每个颜色后面的百分比值表示该颜色在渐变中所占的位置。-webkit-background-clip: text;: 这个属性指定了背景剪切的方式,将背景仅限于文本的可见部分。background-clip: text;: 这个属性指定了背景剪切的方式,将背景仅限于文本的可见部分。-webkit-text-fill-color: transparent;: 这个属性将文本的填充颜色设置为透明,使得文本的颜色与背景颜色一致,从而实现文本透明的效果。
background: radial-gradient(circle at 49.86% 48.37%,#0090ff 0,#0089ff 3.33%,#3a82ff 6.67%,#717aff 10%,#9371fb 13.33%,#ae67ef 16.67%,#c45de1 20%,#d652d2 23.33%,#e448c2 26.67%,#ef3eb0 30%,#f7369e 33.33%,#fd318c 36.67%,#ff317a 40%,#ff3569 43.33%,#fd3d57 46.67%,#f94646 50%,#f35035 53.33%,#ea5a22 56.67%,#e16308 60%,#d56d00 63.33%,#c97500 66.67%,#bb7d00 70%,#ac8300 73.33%,#9d8900 76.67%,#8c8f00 80%,#7a9300 83.33%,#669700 86.67%,#4f9b00 90%,#309e0e 93.33%,#00a029 96.67%,#00a23d 100%);-webkit-background-clip: text;background-clip: text;-webkit-text-fill-color: transparent;6.斜切动画

设置::before伪元素,把宽度设为0%,设置定位,父元素定位设置relative。把left设置为负数,想当于伪元素在按钮外面。并且设置父元素的overflow为hidden,这样只能看见在边框里面的。并且设置伪元素的z-index比父元素的z-index低,这样文字就会出现在伪元素的上面了。然后设置transform的
skewx斜切角度,这样就会有进度条变多的效果。
.el-button {width: 80%;transition: all 0.3s;position:relative;color:$strong;background:#fff;border:1px solid $strong;padding:0 20px;overflow:hidden;z-index:1;&:hover {color: #fff;&::before {width:180%;}}&::before {content: "";height: 100%;position: absolute;left: -30px;top: 0;background-color: $strong;transform: skewX(45deg);//斜切width: 0%;transition: all 1s;z-index: -1;}}
7.手写三种css3边框动画
前两种动画是根据width和height的变化,以及设置延时时间以及和定位的不同产生的动画。
第三种是根据scale的变化
只有当scale的参数都为1时,元素才会显示,而这时我只需要一个设置x为0,after设置y为0;然后hover的时候把他们变为1即可完成动画。
1.第一种顺时针显示
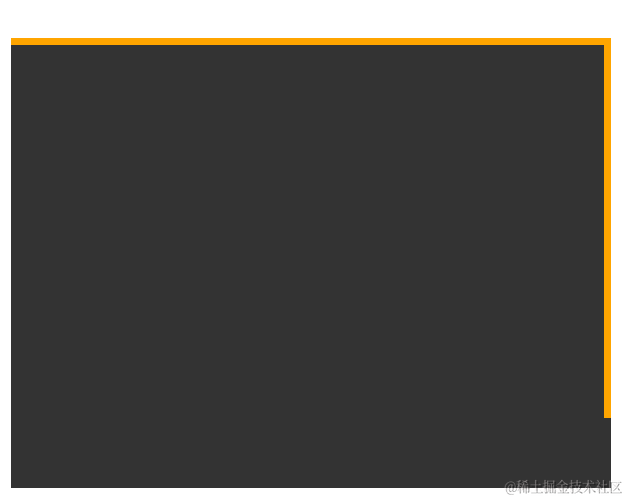
核心代码如下
.type1::before {top:0;left: 0;
}
.type1::after {right: 0;bottom: 0;
}.type1:hover::after {width: 100%;height: 100%;border-bottom-color:orange;border-left-color: orange;/* 边框颜色也要延迟时间 */transition: border-color .5s ease-out 1s,width .5s ease-out 1s,height .5s ease-out 1.5s;}
.type1:hover::before{width: 100%;height: 100%;border-top-color: orange;border-right-color: orange;transition: width .5s ease-out,height .5s ease-out .5s;}
2.第二种,总起点开始两条边框同时显示。
核心代码如下
/* 第二种 */
.type2::before {top:0;left: 0;
}
.type2::after {top: 0;left: 0;
}.type2:hover::after {width: 100%;height: 100%;border-bottom-color:orange;border-left-color: orange;/* 边框颜色也要延迟时间 */transition:height .5s ease-out,width .5s ease-out .5s;
}
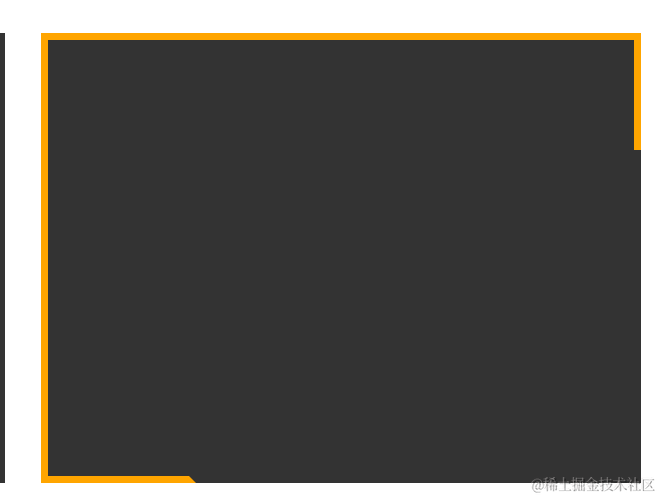
.type2:hover::before{width: 100%;height: 100%;border-top-color: orange;border-right-color: orange;transition: width .5s ease-out,height .5s ease-out .5s;}3.第三种、scale(从边框中心点开始变多)

核心代码如下
/* 第三种 */.type3::before, .type3::after {top: 0;left: 0;height: 100%;width: 100%;-webkit-transform-origin: center;transform-origin: center;}.type3::before {border-top: 5px solid orange;border-bottom: 5px solid orange;/* -webkit-transform: scale3d(0, 1, 1); *//* transform: scale3d(0, 1, 1); */transform: scale(0,1);}.type3::after {border-left: 5px solid orange;border-right: 5px solid orange;/* -webkit-transform: scale3d(1, 0, 1); */transform: scale(1, 0);}.type3:hover::before, .type3:hover::after {/* -webkit-transform: scale3d(1, 1, 1); */transform: scale(1,1);transition: transform 1s, -webkit-transform 1s;}通用代码设置
通用代码主要设置的是布局,比如伪元素设置绝对定位,而父盒子设置相对定位。而伪元素设置先设置宽高为100%,然后设置为0;当hover的时候再改变。
结构代码
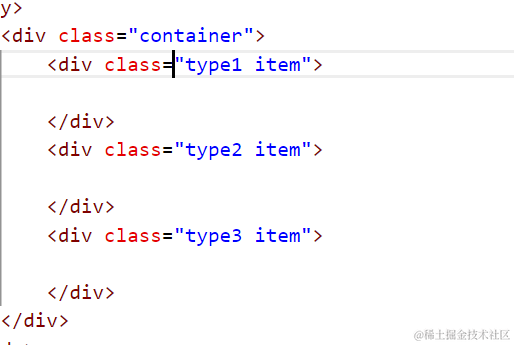
代码如下
* {margin:0;padding:0;
}.container div {box-sizing: border-box;width:400px;height: 300px;background:#333;overflow: hidden;
}
.item {border:0;position:relative;
}
.item::before {width:100%;height: 100%;box-sizing: border-box;border: 5px solid transparent;border-bottom: none;border-left: none;content: "";position: absolute;width:0;height: 0;
}
.item::after {box-sizing: border-box;border: 5px solid transparent;content: "";position: absolute;width: 0;height: 0;
}.container {margin-top:100px;display: flex;justify-content: space-around;
}
8.文字下划线动画

background-size的两个参数主要是控制背景的宽、高的大小。
一开始设置宽为0,并且把背景的位置设置在左下。这样当hover的时候,下划线就会从左边开始变大。
h4 {display: inline-block;background: linear-gradient(to right, red, rgba(255, 166, 0, 0.584)) no-repeat;background-size: 0px 2px;background-position: 0 bottom; //左偏移0 上偏移20pxtransition: background-size 0.35s;padding-bottom: 5px;&:hover {background-size: 100% 2px;background-position:0 bottom;}}