青岛网站建设网址百度网站提交入口
若该文为原创文章,转载请注明原文出处。
一、介绍
最近接触网页大屏,所以就想把YOLOV5部署到WEB端,通过了解,知道了两个方法:
1、基于Flask部署YOLOv5目标检测模型。
2、基于Streamlit部署YOLOv5目标检测。
代码在github上,个人感觉两个比较好的,所以基于两份代码测试。
https://github.com/ngzhili/Yolov5-Real-Time-Object-Detection
GitHub - harshit-tech03/Fire_Detection: A fire detection web app using yolov5.
一、虚拟环境创建
1、创建虚拟环境
conda create -n yolov5_env python=3.8 2、激活环境
conda activate yolov5_env3、下载yolov5
https://github.com/ultralytics/yolov54、安装yolov5
pip install -r requirements.txt注意以下测试都是基于此环境测试
二、基于Flask部署YOLOv5目标检测模型。
1、安装环境
requirements.txt
flask
requests
blackmatplotlib>=3.2.2
numpy>=1.18.5
opencv-python>=4.1.2
Pillow
PyYAML>=5.3.1
scipy>=1.4.1
torch>=1.7.0
torchvision>=0.8.1
tqdm>=4.41.0tensorboard>=2.4.1seaborn>=0.11.0
pandasthop  # FLOPs computation
代码感觉相对简单,而且也挺详细的,所以直接上代码。
2、前端代码
index.html
<!DOCTYPE html>
<html><head><meta charset="utf-8"><meta content="width=device-width, initial-scale=1.0" name="viewport"><title>YOLOV5 Real Time Inference</title><style>.corner {border-radius: 25px;border: 5px solid #212aad;padding: 0px;width:60%;height:auto;text-align: center;}.video-container {justify-content: center;text-align: center;height:100%;/*border: 1px solid black;*/}</style></head><body ><div class="container"><div class="row" style="text-align: center; width:100%;"><img src="../static/pytorch.png" style="width:40px; position:relative; left: -10px; display:inline-block;"><h1 style="text-align: center; display:inline-block;">Template for YOLOV5 Object Detection Model Real-Time Inference Using Web Cam</h1></img><h2 style="text-align: center;">Built by Zhili</h2></div></div><div class="video-container"><img src="{{ url_for('video') }}" class="corner"></img><!--<img src="../static/pytorch.png" class="corner"></img>--><!--<img src="{{ url_for('video') }}" width="50%"/>--></div></body>
</html>
3、后端代码
app.py
"""
Simple app to upload an image via a web form
and view the inference results on the image in the browser.
"""
import argparse
import io
import os
from PIL import Image
import cv2
import numpy as npimport torch
from flask import Flask, render_template, request, redirect, Responseapp = Flask(__name__)#'''
# Load Pre-trained Model
#model = torch.hub.load(
#        "ultralytics/yolov5", "yolov5s", pretrained=True, force_reload=True
#        )#.autoshape()  # force_reload = recache latest code
#'''
# Load Custom Model
#model = torch.hub.load("ultralytics/yolov5", "custom", path = "./best_damage.pt", force_reload=True)
model = torch.hub.load('./yolov5', 'custom', './yolov5s.pt',source='local')
# Set Model Settings
model.eval()
model.conf = 0.6  # confidence threshold (0-1)
model.iou = 0.45  # NMS IoU threshold (0-1) from io import BytesIOdef gen():cap=cv2.VideoCapture(0)# Read until video is completedwhile(cap.isOpened()):# Capture frame-by-fram ## read the camera framesuccess, frame = cap.read()if success == True:ret,buffer=cv2.imencode('.jpg',frame)frame=buffer.tobytes()#print(type(frame))img = Image.open(io.BytesIO(frame))results = model(img, size=640)#print(results)#print(results.pandas().xyxy[0])#results.render()  # updates results.imgs with boxes and labelsresults.print()  # print results to screen#results.show() #print(results.imgs)#print(type(img))#print(results)#plt.imshow(np.squeeze(results.render()))#print(type(img))#print(img.mode)#convert remove single-dimensional entries from the shape of an arrayimg = np.squeeze(results.render()) #RGB# read image as BGRimg_BGR = cv2.cvtColor(img, cv2.COLOR_RGB2BGR) #BGR#print(type(img))#print(img.shape)#frame = img#ret,buffer=cv2.imencode('.jpg',img)#frame=buffer.tobytes()#print(type(frame))#for img in results.imgs:#img = Image.fromarray(img)#ret,img=cv2.imencode('.jpg',img)#img=img.tobytes()#encode output image to bytes#img = cv2.imencode('.jpg', img)[1].tobytes()#print(type(img))else:break#print(cv2.imencode('.jpg', img)[1])#print(b)#frame = img_byte_arr# Encode BGR image to bytes so that cv2 will convert to RGBframe = cv2.imencode('.jpg', img_BGR)[1].tobytes()#print(frame)yield(b'--frame\r\n'b'Content-Type: image/jpeg\r\n\r\n' + frame + b'\r\n')@app.route('/')
def index():return render_template('index.html')@app.route('/video')
def video():"""Video streaming route. Put this in the src attribute of an img tag."""return Response(gen(),mimetype='multipart/x-mixed-replace; boundary=frame')
'''
@app.route('/video')
def video():return Response(generate_frames(),mimetype='multipart/x-mixed-replace; boundary=frame')
'''
'''
@app.route("/", methods=["GET", "POST"])
def predict():if request.method == "POST":if "file" not in request.files:return redirect(request.url)file = request.files["file"]if not file:returnimg_bytes = file.read()img = Image.open(io.BytesIO(img_bytes))results = model(img, size=640)# for debugging# data = results.pandas().xyxy[0].to_json(orient="records")# return dataresults.render()  # updates results.imgs with boxes and labelsfor img in results.imgs:img_base64 = Image.fromarray(img)img_base64.save("static/image0.jpg", format="JPEG")return redirect("static/image0.jpg")return render_template("index.html")
'''if __name__ == "__main__":parser = argparse.ArgumentParser(description="Flask app exposing yolov5 models")parser.add_argument("--port", default=5000, type=int, help="port number")args = parser.parse_args()'''model = torch.hub.load("ultralytics/yolov5", "yolov5s", pretrained=True, force_reload=True).autoshape()  # force_reload = recache latest codemodel.eval()'''app.run(host="0.0.0.0", port=args.port)  # debug=True causes Restarting with stat# Docker Shortcuts
# docker build --tag yolov5 .
# docker run --env="DISPLAY" --volume="/tmp/.X11-unix:/tmp/.X11-unix:rw" --device="/dev/video0:/dev/video0" yolov5
4、运行结果
执行python app.py


三、基于Streamlit部署YOLOv5目标检测。
1、什么是Streamlit
Streamlit 是一个用于数据科学和机器学习的开源 Python 框架。它提供了一种简单的方式来构建交互式应用程序,使数据科学家和机器学习工程师可以更轻松地将他们的模型展示给其他人。
以下是 Streamlit 常用的一些方法:
st.write():打印文本、数据框、图表等。st.title():创建标题。st.header():创建大标题。st.subheader():创建小标题。st.text():打印文本。st.markdown():打印 Markdown 文本。st.latex():打印 LaTeX 公式。st.dataframe():显示数据框。st.table():显示表格。st.line_chart():创建线形图。st.area_chart():创建面积图。st.bar_chart():创建条形图。st.map():创建地图。st.pyplot():显示 Matplotlib 图表。st.altair_chart():显示 Altair 图表。st.vega_lite_chart():显示 Vega-Lite 图表。st.bokeh_chart():显示 Bokeh 图表。st.plotly_chart():显示 Plotly 图表。st.image():显示图像。st.audio():显示音频。st.video():显示视频。st.file_uploader():上传文件。st.download_button():下载文件。
以上是 Streamlit 的一些常用方法,可以根据需要选择使用。
只能説Streamlit比Flask更简单,更容易看懂。
在上面环境的基础上在安装一次环境
2、安装环境
requirements.txt
yolov5
opencv_python_headless
streamlit
numpy
Pillow
torch
torchvision
PyYAML
tqdm
matplotlib
requests
scipy
tensorboard
pandas
seaborn
streamlit-webrtc
IPython
3、代码
代码不分前后端
Fire_Detection.py
import streamlit as st
import cv2
import numpy as np
import av
import torch
import tempfile
from PIL import Image@st.cache
def load_model():model = torch.hub.load('ultralytics/yolov5','custom',path="weights/last.pt",force_reload=True)return modeldemo_img = "fire.9.png"
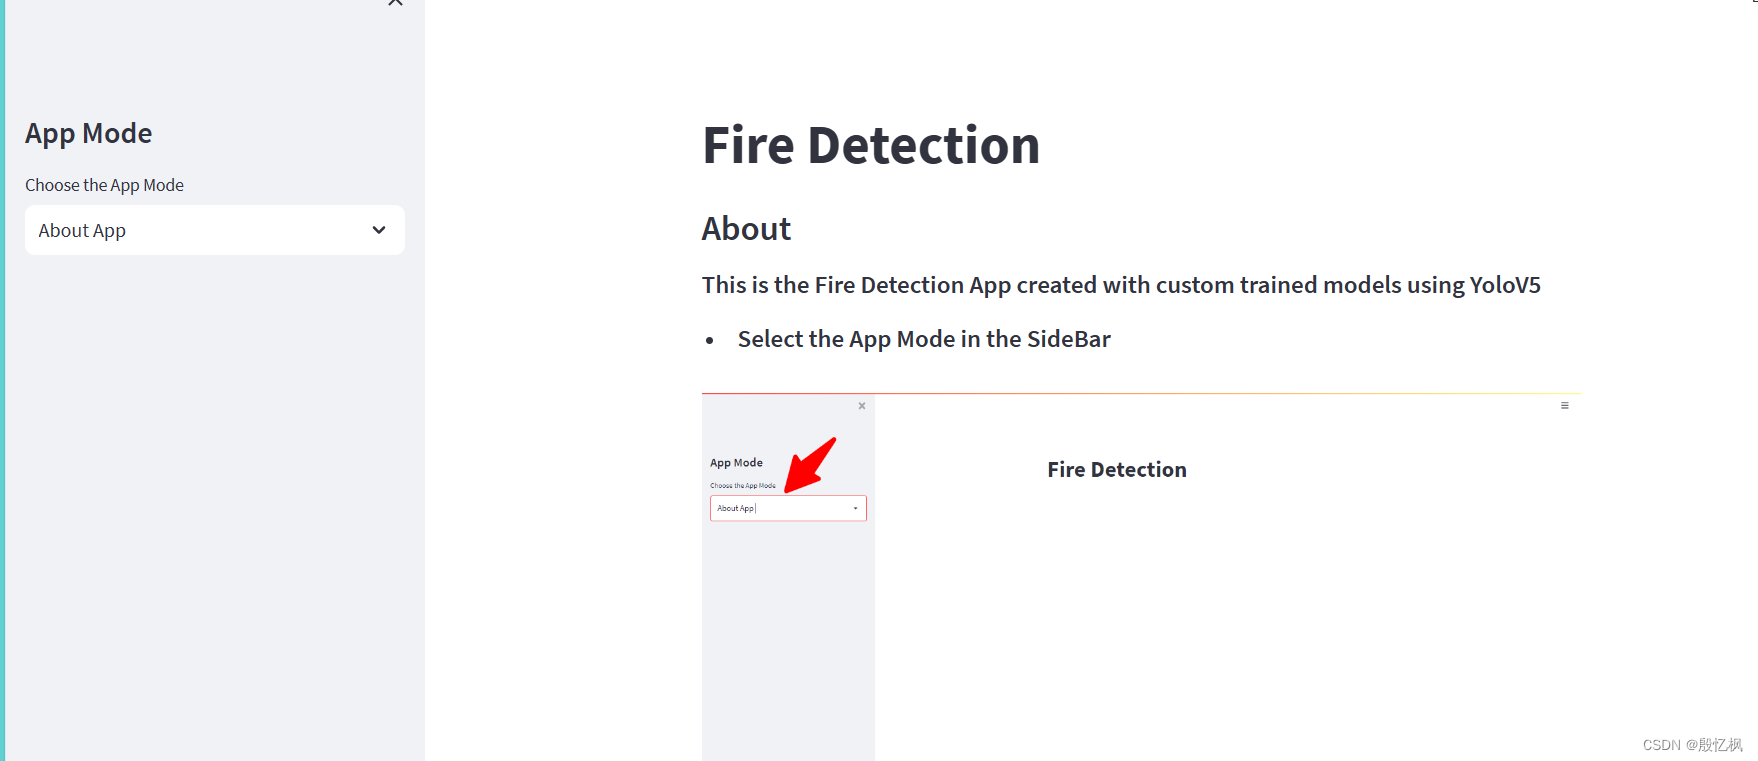
demo_video = "Fire_Video.mp4"st.title('Fire Detection')
st.sidebar.title('App Mode')app_mode = st.sidebar.selectbox('Choose the App Mode',['About App','Run on Image','Run on Video','Run on WebCam'])if app_mode == 'About App':st.subheader("About")st.markdown("<h5>This is the Fire Detection App created with custom trained models using YoloV5</h5>",unsafe_allow_html=True)st.markdown("- <h5>Select the App Mode in the SideBar</h5>",unsafe_allow_html=True)st.image("Images/first_1.png")st.markdown("- <h5>Upload the Image and Detect the Fires in Images</h5>",unsafe_allow_html=True)st.image("Images/second_2.png")st.markdown("- <h5>Upload the Video and Detect the fires in Videos</h5>",unsafe_allow_html=True)st.image("Images/third_3.png")st.markdown("- <h5>Live Detection</h5>",unsafe_allow_html=True)st.image("Images/fourth_4.png")st.markdown("- <h5>Click Start to start the camera</h5>",unsafe_allow_html=True)st.markdown("- <h5>Click Stop to stop the camera</h5>",unsafe_allow_html=True)st.markdown("""## Features
- Detect on Image
- Detect on Videos
- Live Detection
## Tech Stack
- Python
- PyTorch
- Python CV
- Streamlit
- YoloV5
## 🔗 Links
[](https://github.com/AntroSafin)
""")if app_mode == 'Run on Image':st.subheader("Detected Fire:")text = st.markdown("")st.sidebar.markdown("---")# Input for Imageimg_file = st.sidebar.file_uploader("Upload an Image",type=["jpg","jpeg","png"])if img_file:image = np.array(Image.open(img_file))else:image = np.array(Image.open(demo_img))st.sidebar.markdown("---")st.sidebar.markdown("**Original Image**")st.sidebar.image(image)# predict the imagemodel = load_model()results = model(image)length = len(results.xyxy[0])output = np.squeeze(results.render())text.write(f"<h1 style='text-align: center; color:red;'>{length}</h1>",unsafe_allow_html = True)st.subheader("Output Image")st.image(output,use_column_width=True)if app_mode == 'Run on Video':st.subheader("Detected Fire:")text = st.markdown("")st.sidebar.markdown("---")st.subheader("Output")stframe = st.empty()#Input for Videovideo_file = st.sidebar.file_uploader("Upload a Video",type=['mp4','mov','avi','asf','m4v'])st.sidebar.markdown("---")tffile = tempfile.NamedTemporaryFile(delete=False)if not video_file:vid = cv2.VideoCapture(demo_video)tffile.name = demo_videoelse:tffile.write(video_file.read())vid = cv2.VideoCapture(tffile.name)st.sidebar.markdown("**Input Video**")st.sidebar.video(tffile.name)# predict the videowhile vid.isOpened():ret, frame = vid.read()if not ret:breakframe = cv2.cvtColor(frame,cv2.COLOR_BGR2RGB)model = load_model()results = model(frame)length = len(results.xyxy[0])output = np.squeeze(results.render())text.write(f"<h1 style='text-align: center; color:red;'>{length}</h1>",unsafe_allow_html = True)stframe.image(output)if app_mode == 'Run on WebCam':st.subheader("Detected Fire:")text = st.markdown("")st.sidebar.markdown("---")st.subheader("Output")stframe = st.empty()run = st.sidebar.button("Start")stop = st.sidebar.button("Stop")st.sidebar.markdown("---")cam = cv2.VideoCapture(0)if(run):while(True):if(stop):breakret,frame = cam.read()frame = cv2.cvtColor(frame,cv2.COLOR_BGR2RGB)model = load_model()results = model(frame)length = len(results.xyxy[0])output = np.squeeze(results.render())text.write(f"<h1 style='text-align: center; color:red;'>{length}</h1>",unsafe_allow_html = True)stframe.image(output)
4、运行结果
运行指令
streamlit run Fire_Detection.py
会自动打开网页
demo提供了图片测试,视频测试,和摄像头几个方式的测试方法。由于使用的模型是训练好的模型,所以yolo版本不能修改,只能联网下载。

如果想用自己的yolov5
那修改加载模型,改成本地加载,模型也需要修改。

四、总结
通过两个方式,个人对部署web有了个相对的简单的认识。
在此感谢github,和网友提供的代码。
如有侵权,或需要完整代码,请及时联系博主。