夏家胡同网站建设百度平台客服电话是多少
痛点:
公司打算做安卓软件,最近在研究安卓,打算先绘制样式
研究发现安卓并不像前端有那么多组件库,甚至有些基础的组件都需要自己实现,记录一下自己实现的组件
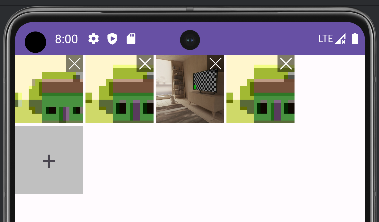
成品展示
一个上传图片的组件
-
可以选择拍照或者从相册中上传
-
上传可以限制数量
-
上传后可以选择某张图片删除

引入依赖
在build.gradle中引入以下依赖
//图片选择器
implementation("com.github.wildma:PictureSelector:2.1.0")
//照片查看器,可以放大缩小照片
implementation("com.github.chrisbanes:PhotoView:2.3.0")
//自动换行的layout,帮助实现达到宽度后自动下一行
implementation("com.google.android:flexbox:2.0.1")
使用
使用只需要xml中添加该组件即可,其中app开头的属性都是为了让他可以自动换行
<com.example.androidtest.test.UploadLayoutandroid:id="@+id/uploadLayout"android:layout_width="match_parent"android:layout_height="wrap_content"app:flexWrap="wrap"app:alignItems="stretch"app:alignContent="stretch"app:justifyContent="flex_start"/>
初始化
创建UploadLayout继承FlexboxLayout
继承FlexboxLayout可以实现自动换行,当我们插入的图片占满一行后,会自己换行,如下所示
加载添加按钮
初始化时需要把灰色的添加按钮加载进来
限制最大照片数
maxImage属性用来限制最大上传照片数量
public class UploadLayout extends FlexboxLayout {//最大上传图片数量private Integer maxImage = -1;private TextView uploadPhotoTextView;public UploadLayout(Context context) {super(context);init();}public UploadLayout(Context context, AttributeSet attrs) {super(context, attrs);TypedArray a = context.obtainStyledAttributes(attrs, R.styleable.UploadLayout);maxImage = a.getInteger(R.styleable.UploadLayout_maxImage, -1);a.recycle();init();}public UploadLayout(Context context, AttributeSet attrs, int defStyleAttr) {super(context, attrs, defStyleAttr);init();}private void init() {// 创建一个新的 TextView 控件uploadPhotoTextView = new TextView(getContext());// 设置控件的属性int weight = (int) UiUtils.dp2px(getContext(),80);uploadPhotoTextView.setId(View.generateViewId()); // 生成一个唯一的 IDuploadPhotoTextView.setWidth(weight); // 设置宽度为 80dpuploadPhotoTextView.setHeight(weight); // 设置高度为 80dpuploadPhotoTextView.setGravity(Gravity.CENTER); // 设置文本居中对齐uploadPhotoTextView.setBackground(ContextCompat.getDrawable(getContext(), R.color.viewfinder_text_color4)); // 设置背景颜色uploadPhotoTextView.setText("+"); // 设置文本内容为 "+"uploadPhotoTextView.setTextSize(30); // 设置文本大小为 30dpuploadPhotoTextView.setOnClickListener(new View.OnClickListener() {@Overridepublic void onClick(View v) {// 在这里添加点击事件的逻辑uploadPhoto(v);}});// 设置控件的布局参数,可以根据需要设置边距等LinearLayout.LayoutParams layoutParams = new LinearLayout.LayoutParams(weight,weight);layoutParams.setMargins(0, 0, 10, 10); // 设置右边距为 10dp,底边距为 10dpuploadPhotoTextView.setLayoutParams(layoutParams);// 将 TextView 添加到父容器中addView(uploadPhotoTextView);}
}
创建控件时读取参数
在xml中直接使用时,走的是以下构造方法
public UploadLayout(Context context, AttributeSet attrs) {super(context, attrs);TypedArray a = context.obtainStyledAttributes(attrs, R.styleable.UploadLayout);maxImage = a.getInteger(R.styleable.UploadLayout_maxImage, -1);a.recycle();init();}
限制最大上传数
<com.example.androidtest.test.UploadLayoutandroid:id="@+id/uploadLayout"android:layout_width="match_parent"android:layout_height="wrap_content"app:flexWrap="wrap"app:alignItems="stretch"app:alignContent="stretch"app:justifyContent="flex_start"app:maxImage="2"/>
需要在res/values/attrs.xml中添加以下代码,让他能读取到maxImage
<declare-styleable name="UploadLayout"><attr name="maxImage" format="integer" /></declare-styleable>
添加点击事件
selectPicture设置false表示不需要裁剪,如果需要裁剪可以设置为true,测试时报错,好像原因是手机没有照片裁剪器
public void uploadPhoto(View view){Activity activity = (Activity) view.getContext();//判断数量是否已经达到上线int imageViewCount = 0;for (int i = 0; i < getChildCount(); i++) {View childView = getChildAt(i);if (childView instanceof RelativeLayout) {imageViewCount++;}}if (imageViewCount == maxImage) {//达到上限Toast.makeText(getContext(), "图片上传已达上限", Toast.LENGTH_SHORT).show();return;}//打开照片选择器,PictureSelector.create(activity, PictureSelector.SELECT_REQUEST_CODE).selectPicture(false);}
上传照片回调
我的做法是在uploadLayout中依次插入RelativeLayout
RelativeLayout中ImageView用来显示图片,View用来显示删除框
点击查看大图,使用PhotoView可以拖拽放大缩小
public void handleActivityResult(int requestCode, int resultCode, Intent data) {if (requestCode == PictureSelector.SELECT_REQUEST_CODE) {if (data != null) {PictureBean pictureBean = data.getParcelableExtra(PictureSelector.PICTURE_RESULT);RelativeLayout relativeLayout = new RelativeLayout(getContext());ImageView imageView = new ImageView(getContext());int uploadIndex = this.indexOfChild(uploadPhotoTextView);//设置大小int weight80 = (int) UiUtils.dp2px(getContext(),80);int weight20 = (int) UiUtils.dp2px(getContext(),20);// 设置布局参数FlexboxLayout.LayoutParams layoutParams = new FlexboxLayout.LayoutParams(weight80,weight80); layoutParams.setMargins(0,0, 10, 10);layoutParams.setOrder(uploadIndex);relativeLayout.setLayoutParams(layoutParams);relativeLayout.addView(imageView);if (pictureBean.isCut()) {imageView.setImageBitmap(BitmapFactory.decodeFile(pictureBean.getPath()));} else {imageView.setImageURI(pictureBean.getUri());}//删除按钮View closeView = new View(getContext());closeView.setBackgroundResource(R.drawable.cross_shape);RelativeLayout.LayoutParams closeParams = new RelativeLayout.LayoutParams(weight20,weight20);// 设置ImageView在RelativeLayout中的位置,这里设置为右上角closeParams.addRule(RelativeLayout.ALIGN_PARENT_RIGHT);closeParams.addRule(RelativeLayout.ALIGN_PARENT_TOP);closeView.setLayoutParams(closeParams);relativeLayout.addView(closeView);//使用 Glide 加载图片Glide.with(this).load(pictureBean.isCut() ? pictureBean.getPath() : pictureBean.getUri()).apply(RequestOptions.centerCropTransform()).into(imageView);//图片点击大图imageView.setOnClickListener(v -> {// 创建一个 Dialog 来显示大图Dialog dialog = new Dialog(getContext(), android.R.style.Theme_Black_NoTitleBar_Fullscreen);dialog.setContentView(R.layout.dialog_image_preview);PhotoView photoView = dialog.findViewById(R.id.photoView);// 使用 Glide 加载大图到 PhotoViewGlide.with(this).load(pictureBean.isCut() ? pictureBean.getPath() : pictureBean.getUri()) // 替换为您的大图 URL.into(photoView);// 点击大图时关闭 DialogphotoView.setOnClickListener(vm -> dialog.dismiss());dialog.show();});//删除closeView.setOnClickListener(v -> {androidx.appcompat.app.AlertDialog.Builder builder = new AlertDialog.Builder(v.getContext());builder.setView(R.layout.dialog_delete_img);builder.setCancelable(false);//能否被取消AlertDialog dialog = builder.create();dialog.show();View cancel = dialog.findViewById(R.id.delete_img_cancel);View commit = dialog.findViewById(R.id.delete_img_commit);cancel.setOnClickListener(v1 -> dialog.dismiss());commit.setOnClickListener(v1 -> {RelativeLayout parentRelativeLayout= (RelativeLayout) closeView.getParent();if (parentRelativeLayout != null) {removeView(parentRelativeLayout);}dialog.dismiss();});});addView(relativeLayout);}}}
删除弹窗:dialog_delete_img.xml
<RelativeLayoutandroid:layout_width="match_parent"android:layout_height="wrap_content"android:padding="15dp"><TextViewandroid:id="@+id/title"android:layout_width="wrap_content"android:layout_height="wrap_content"android:text="确定要删除这张照片吗?"android:textColor="@color/black"android:textSize="15dp"android:layout_centerHorizontal="true"android:layout_marginBottom="30dp"/><RelativeLayoutandroid:layout_width="match_parent"android:layout_height="wrap_content"android:layout_below="@+id/title"android:layout_marginHorizontal="30dp"><Buttonandroid:id="@+id/delete_img_cancel"android:layout_width="120dp"android:layout_height="40dp"android:text="取消"android:textColor="@color/button_orange"android:textSize="15dp"android:layout_alignParentLeft="true"android:background="@drawable/tab_layout_item3"/><Buttonandroid:id="@+id/delete_img_commit"android:layout_width="120dp"android:layout_height="40dp"android:text="确定"android:textColor="@color/white"android:textSize="15dp"android:layout_alignParentRight="true"android:background="@drawable/tab_layout_item4"/></RelativeLayout></RelativeLayout>
删除图案:cross_shape.xml
<?xml version="1.0" encoding="utf-8"?>
<!-- cross_shape.xml -->
<layer-list xmlns:android="http://schemas.android.com/apk/res/android"><!-- 背景色 --><item><shape android:shape="rectangle"><solid android:color="#80000000" /></shape></item><item><rotateandroid:fromDegrees="45"android:toDegrees="45"><shape android:shape="line"><stroke android:width="1dp" android:color="#FFFFFF" /></shape></rotate></item><item><rotateandroid:fromDegrees="135"android:toDegrees="135"><shape android:shape="line"><stroke android:width="1dp" android:color="#FFFFFF" /></shape></rotate></item></layer-list>
重写Activity方法
在调用的页面的需要重写onActivityResult(),执行咱们的回调函数
public class MainActivity extends AppCompatActivity {private UploadLayout uploadLayout;@Overrideprotected void onCreate(Bundle savedInstanceState) {super.onCreate(savedInstanceState);setContentView(R.layout.activity_main);uploadLayout = findViewById(R.id.uploadLayout);}@Overrideprotected void onActivityResult(int requestCode, int resultCode, @Nullable Intent data) {super.onActivityResult(requestCode, resultCode, data);uploadLayout.handleActivityResult(requestCode,resultCode,data);}
}
补充
昨天看了一下,每次使用的时候都要手动指定自动换行(app开头的这些属性),非常麻烦,可以在初始化的时候将这些属性设置进去
<com.example.androidtest.test.UploadLayoutandroid:id="@+id/uploadLayout"android:layout_width="match_parent"android:layout_height="wrap_content"app:flexWrap="wrap"app:alignItems="stretch"app:alignContent="stretch"app:justifyContent="flex_start"/>
修改init方法
init方法中添加这几行,提前设置属性即可
super.setFlexWrap(FlexWrap.WRAP);super.setAlignItems(AlignItems.STRETCH);super.setAlignContent(AlignContent.STRETCH);super.setJustifyContent(JustifyContent.FLEX_START);