佛山网站建设wantsun天津网站制作系统
一、RadioButton(单选按钮)
1.1、简介
RadioButton表示单选按钮,是button的子类,每一个按钮都有选择和未选中两种状态,经常与RadioGroup一起使用,否则不能实现其单选功能。RadioGroup继承自LinearLayout,可以使用Orientation属性控制RadioButton的排列方向。单项选择相信大家都不陌生吧。Android平台也提供了单项选择的组件,可以通过RadioGroup、RadioButton组合起来完成一个单项选择的效果。
1.2、基本用法与事件处理
如题单选按钮,就是只能够选中一个,所以我们需要把RadioButton放到RadioGroup按钮组中,从而实现 单选功能!先熟悉下如何使用RadioButton,一个简单的性别选择的例子: 另外我们可以为外层RadioGroup设置orientation属性然后设置RadioButton的排列方式,是竖直(android:orientation="vertical")还是水平((android:orientation="horizontal")!
1.2.1、获得选中的值有四种方式:
(1)、为RadioButton在xml中设置一个事件监听器
XML:
<RadioGroupandroid:id="@+id/rg1"android:layout_width="match_parent"android:layout_height="wrap_content"android:orientation="vertical"><RadioButtonandroid:id="@+id/radiobutton1"android:layout_width="wrap_content"android:layout_height="wrap_content"android:onClick="btnRadioButton1"android:text="男"android:textSize="30dp"/><RadioButtonandroid:id="@+id/radiobutton2"android:layout_width="wrap_content"android:layout_height="wrap_content"android:onClick="btnRadioButton2"android:text="女"android:textSize="30dp"/>
</RadioGroup>
Activity:
public class MainActivity extends AppCompatActivity {private RadioButton radioButton1;private RadioButton radioButton2;private TextView textView;@Overrideprotected void onCreate(Bundle savedInstanceState) {super.onCreate(savedInstanceState);setContentView(R.layout.activity_view_main);radioButton1 = findViewById(R.id.radiobutton1);radioButton2 = findViewById(R.id.radiobutton2);textView = findViewById(R.id.textview);}public void btnRadioButton1(View view) {textView.setText("您的性别为男");}public void btnRadioButton2(View view) {textView.setText("您的性别为女");}
}
效果图:

(2)、为RadioButton设置一个事件监听器setOnCheckChangeListener
XML:
<LinearLayout xmlns:android="http://schemas.android.com/apk/res/android"android:layout_width="match_parent"android:layout_height="match_parent"android:orientation="vertical"><TextViewandroid:layout_width="match_parent"android:layout_height="wrap_content"android:text="请选择性别?"android:textSize="20sp"android:textStyle="bold"android:layout_margin="10dp"/><RadioGroupandroid:id="@+id/radiogroup"android:layout_width="match_parent"android:layout_height="wrap_content"android:orientation="vertical"><RadioButtonandroid:id="@+id/radiobutton1"android:layout_width="wrap_content"android:layout_height="wrap_content"android:text="男"android:textSize="30dp"/><RadioButtonandroid:id="@+id/radiobutton2"android:layout_width="wrap_content"android:layout_height="wrap_content"android:text="女"android:textSize="30dp"/></RadioGroup><TextViewandroid:id="@+id/textview"android:layout_width="wrap_content"android:layout_height="wrap_content"android:textColor="@color/red"android:layout_margin="10dp"android:textSize="18sp"/></LinearLayout>
Activity:
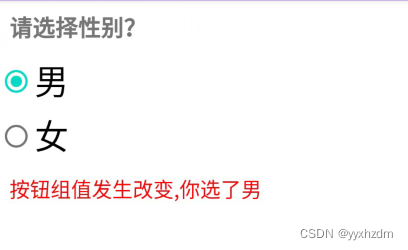
public class MainActivity extends AppCompatActivity {private RadioGroup mBtnRadioGroup;private TextView textView;@Overrideprotected void onCreate(Bundle savedInstanceState) {super.onCreate(savedInstanceState);setContentView(R.layout.activity_view_main);mBtnRadioGroup = findViewById(R.id.radiogroup);textView = findViewById(R.id.textview);mBtnRadioGroup.setOnCheckedChangeListener(new         RadioGroup.OnCheckedChangeListener() {@Overridepublic void onCheckedChanged(RadioGroup group, int checkedId) {RadioButton radbtn = findViewById(checkedId);textView.setText("按钮组值发生改变,你选了" + radbtn.getText());}});}
}
效果图:

注意:另外有一点要切记,要为每个RadioButton添加一个id,不然单选功能会生效!!!
(3)、是判断被点击的id是哪一个单选按钮的id,通过id去获取值
XML与效果图同上
Activity:
public class MainActivity extends AppCompatActivity {private RadioGroup mBtnRadioGroup;private TextView textView;@Overrideprotected void onCreate(Bundle savedInstanceState) {super.onCreate(savedInstanceState);setContentView(R.layout.activity_view_main);mBtnRadioGroup = findViewById(R.id.radiogroup);textView = findViewById(R.id.textview);mBtnRadioGroup.setOnCheckedChangeListener(new RadioGroup.OnCheckedChangeListener() {@Overridepublic void onCheckedChanged(RadioGroup group, int checkedId) {switch (checkedId) {case R.id.radiobutton1:textView.setText("按钮组值发生改变,你选了男");break;case R.id.radiobutton2:textView.setText("按钮组值发生改变,你选了女");break;default:break;}}});}
}
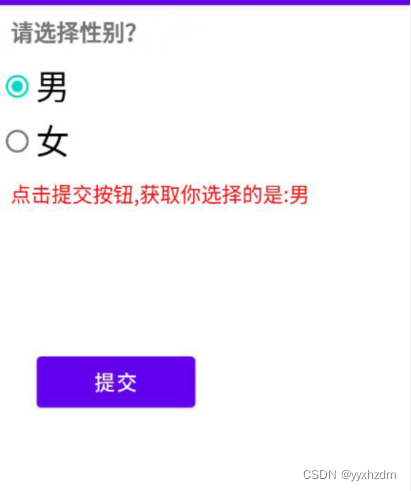
(4)、是通过单击其他按钮获取选中单选按钮的值,当然我们也可以直接获取,这个看需求~
XML:
<LinearLayout xmlns:android="http://schemas.android.com/apk/res/android"android:layout_width="match_parent"android:layout_height="match_parent"android:orientation="vertical"><TextViewandroid:layout_width="match_parent"android:layout_height="wrap_content"android:text="请选择性别?"android:textSize="20sp"android:textStyle="bold"android:layout_margin="10dp"/><RadioGroupandroid:id="@+id/radiogroup"android:layout_width="match_parent"android:layout_height="wrap_content"android:orientation="vertical"><RadioButtonandroid:id="@+id/radiobutton1"android:layout_width="wrap_content"android:layout_height="wrap_content"android:text="男"android:textSize="30dp"/><RadioButtonandroid:id="@+id/radiobutton2"android:layout_width="wrap_content"android:layout_height="wrap_content"android:text="女"android:textSize="30dp"/></RadioGroup><TextViewandroid:id="@+id/textview"android:layout_width="wrap_content"android:layout_height="wrap_content"android:textColor="@color/red"android:layout_margin="10dp"android:textSize="18sp"/><Buttonandroid:id="@+id/btn_sumit"android:layout_width="wrap_content"android:layout_height="wrap_content"android:layout_marginStart="33dp"android:layout_marginTop="114dp"android:paddingStart="50dp"android:paddingEnd="50dp"android:paddingTop="10dp"android:paddingBottom="10dp"android:text="提交"android:textSize="18sp"/></LinearLayout>
Activity:
public class MainActivity extends AppCompatActivity {private RadioGroup mBtnRadioGroup;private TextView textView;private Button mBtnSumit;@Overrideprotected void onCreate(Bundle savedInstanceState) {super.onCreate(savedInstanceState);setContentView(R.layout.activity_view_main);mBtnRadioGroup = findViewById(R.id.radiogroup);mBtnSumit = findViewById(R.id.btn_sumit);textView = findViewById(R.id.textview);mBtnSumit.setOnClickListener(new View.OnClickListener() {@Overridepublic void onClick(View v) {for (int i = 0; i < mBtnRadioGroup.getChildCount(); i++) {RadioButton rd = (RadioButton) mBtnRadioGroup.getChildAt(i);if (rd.isChecked()) {textView.setText("点击提交按钮,获取你选择的是:" + rd.getText());break;}}}});}
}
效果图:
代码解析: 这里我们为提交按钮设置了一个setOnClickListener事件监听器,每次点击的话遍历一次RadioGroup判断哪个按钮被选中我们可以通过下述方法获得RadioButton的相关信息。
- getChildCount( )获得按钮组中的单选按钮的数目;
- getChinldAt(i):根据索引值获取我们的单选按钮
- isChecked( ):判断按钮是否选中
二、Checkbox(复选框)
2.1、简介
CheckBox一般用来提供给用户输入信息的组件,可以一次选择多个选项.这个组件解决了不是很方便的手机屏幕操作输入时.用选择组件供用户单击输入选项,显得非常有用。它是Button的子类,用于实现多选功能。每个复选框都有“选中”和“未选中”两种状态,这两种状态时通过andorid:checked属性指定的,当该属性的值为true时表示选中状态。
2.2、示例
效果图:

XML:
<?xml version="1.0" encoding="utf-8"?>
<LinearLayout xmlns:android="http://schemas.android.com/apk/res/android"android:layout_width="match_parent"android:layout_height="match_parent"android:orientation="vertical"><TextViewandroid:id="@+id/textView_head"android:layout_width="wrap_content"android:layout_height="wrap_content"android:text="请选择你的爱好:"android:textStyle="bold"android:textSize="19dp"/><CheckBoxandroid:id="@+id/checkBox1"android:layout_width="wrap_content"android:layout_height="wrap_content"android:text="游泳" /><CheckBoxandroid:id="@+id/checkBox2"android:layout_width="wrap_content"android:layout_height="wrap_content"android:text="魔方" /><CheckBoxandroid:id="@+id/checkBox3"android:layout_width="wrap_content"android:layout_height="wrap_content"android:text="卡林巴" /><CheckBoxandroid:id="@+id/checkBox4"android:layout_width="wrap_content"android:layout_height="wrap_content"android:text="编程" /><TextViewandroid:id="@+id/textView_end"android:layout_width="wrap_content"android:layout_height="wrap_content"android:text="你选择的爱好是:"android:textStyle="bold"android:textSize="17dp"/>
</LinearLayout>Activity:
public class MainActivity extends AppCompatActivity implements CompoundButton.OnCheckedChangeListener {private TextView mTextViewEnd;private CheckBox mCheckBox01, mCheckBox02, mCheckBox03, mCheckBox04;private String checkString = "";@Overrideprotected void onCreate(Bundle savedInstanceState) {super.onCreate(savedInstanceState);setContentView(R.layout.activity_view_main);mTextViewEnd = findViewById(R.id.textView_end);mCheckBox01 = findViewById(R.id.checkBox1);mCheckBox02 = findViewById(R.id.checkBox2);mCheckBox03 = findViewById(R.id.checkBox3);mCheckBox04 = findViewById(R.id.checkBox4);checkString = "你选择的爱好有:";mCheckBox01.setOnCheckedChangeListener(this);mCheckBox02.setOnCheckedChangeListener(this);mCheckBox03.setOnCheckedChangeListener(this);mCheckBox04.setOnCheckedChangeListener(this);}@Overridepublic void onCheckedChanged(CompoundButton buttonView, boolean isChecked) {String hobby = buttonView.getText().toString();if (isChecked) {if (!checkString.contains(hobby)) {checkString += hobby;mTextViewEnd.setText(checkString);}} else {if (checkString.contains(hobby)) {checkString = checkString.replace(hobby, "");mTextViewEnd.setText(checkString);}}}
}
同样:
复选框,即可以同时选中多个选项,至于获得选中的值,同样有三种方式:
-
1.为每个CheckBox添加事件:setOnCheckedChangeListener;
-
2.弄一个按钮,在点击后,对每个checkbox进行判断:isChecked();
-
3.对选中的按钮id进行判断。
2.3、自定义点击效果
虽然5.0后的RadioButton和Checkbox都比旧版本稍微好看了点,但是对于我们来说 可能还是不喜欢或者需求,需要自己点击效果!实现起来很简单,先编写一个自定义 的selctor资源,设置选中与没选中时的切换图片~
效果图:
自定义复选框选中与未选中背景资源rad_btn_selctor:
<?xml version="1.0" encoding="utf-8"?>
<selector xmlns:android="http://schemas.android.com/apk/res/android">
<item
android:state_enabled="true"
android:state_checked="true"
android:drawable="@mipmap/ic_checkbox_checked"/>
<item
android:state_enabled="true"
android:state_checked="false"
android:drawable="@mipmap/ic_checkbox_normal" />
</selector>
写好后,我们有两种方法设置,也可以说一种吧!你看看就知道了~
①android:button属性设置为上述的selctor
android:button="@drawable/rad_btn_selctor"
②在style中定义一个属性,然后通过android style属性设置,先往style添加下述代码:
<style name="MyCheckBox" parent="@android:style/Widget.CompoundButton.CheckBox">
<item name="android:button">@drawable/rad_btn_selctor</item>
</style>
最后布局那里:
style="@style/MyCheckBox"
2.4、改变文字与选择框的相对位置
这个实现起来也很简单,还记得我们之前学TextView的时候用到的drawableXxx吗? 要控制选择框的位置,两部即可!设置:
Step 1. android:button="@null"
Step 2. android:drawableTop="@android:drawable/btn_radio"
当然我们可以把drawableXxx替换成自己喜欢的效果!
2.5、修改文字与选择框的距离
有时,我们可能需要调节文字与选择框之间的距离,让他们看起来稍微没那么挤,我们可以:
1.在XML代码中控制: 使用android:paddingXxx = “xxx” 来控制距离
2.在Java代码中,稍微好一点,动态计算paddingLeft!
rb.setButtonDrawable(R.drawable.rad_btn_selctor);
int rb_paddingLeft = getResources().getDrawable(R.mipmap.ic_checkbox_checked).getIntrinsicWidth()+5;
rb.setPadding(rb_paddingLeft, 0, 0, 0);