新乡商城网站建设哪家专业黄页引流推广网站软件免费
原文连接Gazebo - Docs: Moving the robot (gazebosim.org)
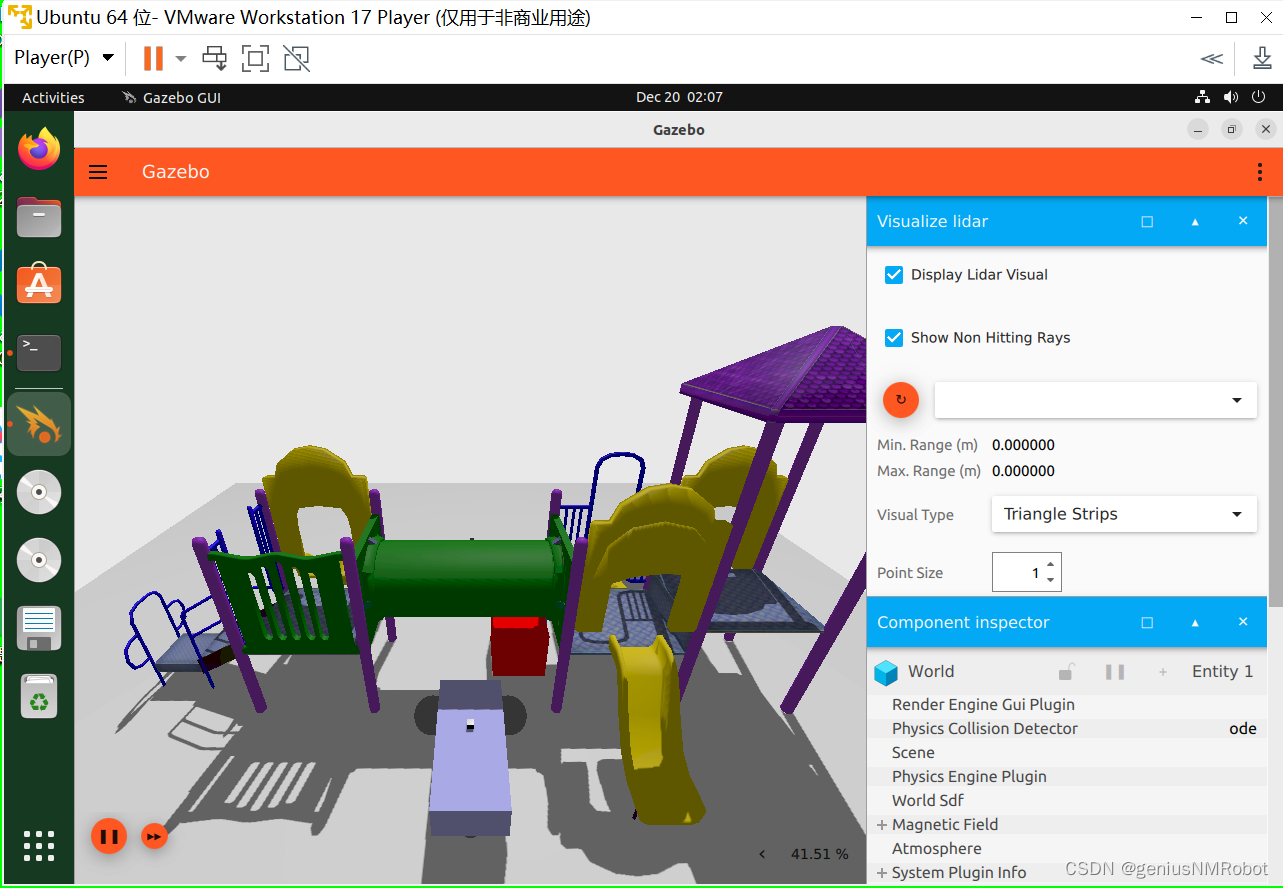
很重要的地方:使用虚拟机运行Ubuntu的时候,需要关闭”加速3D图形“的那个选项,否则gazebo无法正常显示。
Moving the robot(使用命令移动机器人示例)
In this tutorial we will learn how to move our robot. We will use the robot we built in the Build your own robot tutorial. You can download the robot from here. You can also find the finished world of this tutorial here.
What is a plugin
To make our robot move we will use the diff_drive plugin. But before doing so let's answer the question "What is a plugin?" A plugin is a chunk of code that is compiled as a shared library and inserted into the simulation. Plugins make us control many aspects of the simulation like world, models, etc.
Diff_drive plugin
diff_drive plugin helps us control our robot, specifically a robot that can be differentially driven. Let's setup the plugin on our robot. Open the building_robot.sdf and add the following code within the vehicle_blue model tags.
<pluginfilename="gz-sim-diff-drive-system"name="gz::sim::systems::DiffDrive"><left_joint>left_wheel_joint</left_joint><right_joint>right_wheel_joint</right_joint><wheel_separation>1.2</wheel_separation><wheel_radius>0.4</wheel_radius><odom_publish_frequency>1</odom_publish_frequency><topic>cmd_vel</topic>
</plugin>
The <plugin> tag has two attributes, filename which takes the library file name and name which takes the name of the plugin. In the <left_joint> and <right_joint> tags we define the joints which connect the left and the right wheel with the body of the robot, in our case left_wheel_joint and right_wheel_joint. <wheel_separation> takes the distance between the two wheels. Our robot has its left_wheel at 0.6 m and the right_wheel at -0.6 m in y-axis with respect to the chassis, so the wheel_separation is 1.2 m. <wheel_radius> takes the radius of the wheel which was defined in the <radius> tag under the wheel link. <odom_publish_frequency> sets the frequency at which the odometry is published at /model/vehicle_blue/odometry. cmd_vel is the input <topic> to the DiffDrive plugin.
Topics and Messages
Now our model is ready. We just need to send commands (messages) to it. These messages will be published (sent) on the cmd_vel topic defined above.
A topic is simply a name for grouping a specific set of messages or a particular service. Our model will subscribe (listen) to the messages sent on the cmd_vel topic.
Launch the robot world:
gz sim building_robot.sdf
In another terminal let's send a message to to our robot:
gz topic -t "/cmd_vel" -m gz.msgs.Twist -p "linear: {x: 0.5}, angular: {z: 0.05}"
Now you should have your robot moving in the simulation.
Note: Don't forget to press the play button in the simulation.
The command specifies the topic to publish to after the -t option. After the -m we specify the message type. Our robot expects messages of type Twist which consists of two components, linear and angular. After the -p option we specify the content (value) of the message: linear speed x: 0.5 and angular speed z: 0.05.
Hint: You can know what every topic option does using this command: gz topic -h
For more information about Topics and Messages in Gazebo check the Transport library tutorials
Moving the robot using the keyboard(使用按键遥控机器人示例)
Instead of sending messages from the terminal we will send messages using the keyboard keys. To do so we will add two new plugins: KeyPublisher and TriggeredPublisher.
KeyPublisher
KeyPublisher is an gz-gui plugin that reads the keyboard's keystrokes and sends them on a default topic /keyboard/keypress. Let's try this plugin as follows:
-
In one terminal type
gz sim building_robot.sdf -
In the top right corner click on the plugins dropdown list (vertical ellipsis), click the Key Publisher.
-
In another terminal type
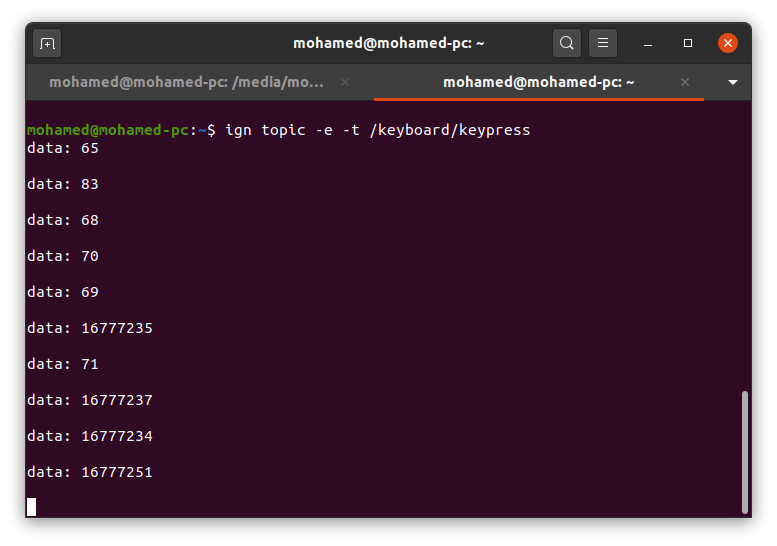
gz topic -e -t /keyboard/keypress
The last command will display all messages sent on /keyboard/keypress topic.
In the Gazebo window press different keys and you should see data (numbers) on the terminal where you run the gz topic -e -t /keyboard/keypress command.
We want to map these keystrokes into messages of type Twist and publish them to the /cmd_vel topic which our model listens to. The TriggeredPublisher plugin will do this.
Triggered Publisher
The TriggeredPublisher plugin publishes a user specified message on an output topic in response to an input message that matches user specified criteria. Let's add the following code under the <world> tag:
<!-- Moving Forward-->
<plugin filename="gz-sim-triggered-publisher-system"name="gz::sim::systems::TriggeredPublisher"><input type="gz.msgs.Int32" topic="/keyboard/keypress"><match field="data">16777235</match></input><output type="gz.msgs.Twist" topic="/cmd_vel">linear: {x: 0.5}, angular: {z: 0.0}</output>
</plugin>
This code defines the triggered-publisher plugin. It accepts messages of type gz.msgs.Int32 on the /keyboard/keypress topic and if the value in the data field matches 16777235(Up arrow key) it outputs a Twist message on the cmd_vel topic with values x: 0.5, z: 0.0.
Now launch building_robot.sdf then add the Key Publisher plugin and our robot should move forward as we press the Up arrow key ↑ (make sure you start the simulation by pressing the play button to see the robot move forward after pressing the Up arrow key).
There is a demo explaining how the Triggered Publisher works.
Moving using arrow keys
To see what values are sent on the /keyboard/keypress topic when pressing the arrows we can use the --echo or -e option
-
Run the model in one terminal:
gz sim building_robot.sdf -
In the top right corner click on the plugins dropdown list (vertical ellipsis), click the Key Publisher.
-
In another terminal run the following command:
gz topic -e -t /keyboard/keypress
Start pressing the arrows keys and see what values they give:
- Left ← : 16777234
- Up ↑ : 16777235
- Right → : 16777236
- Down ↓ : 16777237
We will add the Triggered publisher plugin for each arrow key. For example, the Down arrow:
<!-- Moving Backward-->
<plugin filename="gz-sim-triggered-publisher-system"name="gz::sim::systems::TriggeredPublisher"><input type="gz.msgs.Int32" topic="/keyboard/keypress"><match field="data">16777237</match></input><output type="gz.msgs.Twist" topic="/cmd_vel">linear: {x: -0.5}, angular: {z: 0.0}</output>
</plugin>
Map each arrow (key stroke) with the desired message (movement) as we did with the backward arrow:
- Left ➞ 16777234 ➞ linear: {x: 0.0}, angular: {z: 0.5}
- Up ➞ 16777235 ➞ linear: {x: 0.5}, angular: {z: 0.0}
- Right ➞ 16777236 ➞ linear: {x: 0.0}, angular: {z: -0.5}
- Down ➞ 16777237 ➞ linear: {x: -0.5}, angular: {z: 0.0}
Now it's your turn try to make the robot move using different keys.
In the next tutorial, you'll learn to create your own simulated world with SDF.
Video walk-through
A video walk-through of this tutorial is available from our YouTube channel: Gazebo tutorials: Moving robot.